Showing posts with label azure. Show all posts

Tuesday, January 10, 2017

Type 2 Diabetes Diagnosis

I won't go through all the details, but on December 26th, 2016, I was diagnosed with Type 2 Diabetes. As you probably expect, it means a drastic life-style change for me. I have to give insulin injections, and monitor blood glucose, as well as monitor the amount of carbohydrates that I consume. To help me track that information I found an application on Google Play called Diabetes:M (Play Store). The application is free, but ad supported. You can purchase the ad-free license for ~$9 or so, which I purchased as soon as I was sure it was the application that I wanted to use.

2017-01-11 04.04.33

This allows me to track everything that I need to be successful in controlling my diabetes. This includes information like my meals, my medications, blood pressure, insulin injections, etc. One of my favorite features of Diabetes:M is the ability for the application to sync the SQLite database, that contains all of the logged data, to a cloud storage provider like Dropbox. This, as a developer, got me thinking how I could leverage that so that I can provide my information to my wife so she is aware of what my current blood glucose level is.

To start this project I created an Express node application and put a copy of the SQLite database in the directory structure of the application. I then went to work on creating some SQL queries to pull information from the Diabetes:M database. To start, I queried my most recent glucose level.

dm

One of the important steps to make the data current was for me to find a way to detect when a new version of the database was saved to my Dropbox. To do this, I found an application (for windows) called Directory Monitor. There is a free version of the application, which is what I am currently using, as the free version fits all my needs. I configured the application to run a shell script when the SQLite database file is modified on my system, which happens every time I log information in the Android application.

dm-info

The shell script goes and extracts the dbz file, which is just a gzipped (or some other compression) SQLite file. It takes that extracted database file and puts it in the /data directory in the express application. It then does a git commit and git push of the git repository. This commit triggers a deploy in Azure. Within seconds of me taking my glucose level, the database is updated on Azure, so when my wife wants to check to see how I am doing, she can see the data in near real-time.

So when she opens the site on her phone she would see something like the following:


current-level


She can even see a history of all the events that I have entered into Diabetes:M
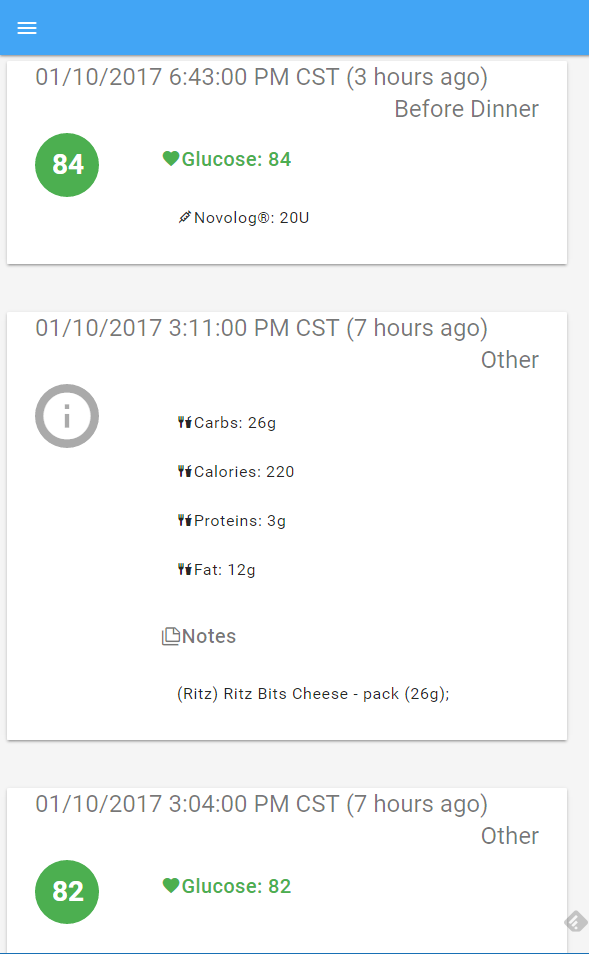
 

log


And, because I could, I added a dashboard with some charts

db1

This is just the beginning of what I have done. I have other things I want to add so my wife, and family, can support me in managing this so I can live a healthier life. Right now, the code for this is not publicly available because it is still very tied to my information and configuration. I will work towards getting this in a place that I can share the code so others can use this.


Some other ideas that I think will be fun, and useful:

  • Alexa Skill – Wife will be able to ask Alexa what my glucose is, and will respond with something like "about 32 minutes ago, Ryan's glucose was 132"
  • iOS/Android 'support' app to be able to receive push notifications when there is a reason for concern, like high, or low glucose levels.
  • More detailed reports and the ability to change the timespan of the data.
  • Support for other systems to monitor the database changes. I have multiple Raspberry PI's that are always running, one of them could monitor the database for changes in Dropbox and the rPi could sync the database.
  • Nightscout (CGM in the Cloud) – Integration / Support for Nightscout and all the work that the community has already done here.
Friday, November 20, 2015

How to Run Hubot on Azure Websites

I wanted to get Hubot working in our slack channels at work and I thought I would share the process I took to get it working and running on Azure Websites.


First, make sure you have nodejs installed

> choco install nodejs.install -y

Make sure npm is up to date

> npm install -g npm

At this point, I also installed coffee-script because the first time I tried running it, I got errors about coffee script

> npm install -g coffee-script

Install the azure-cli node modules to generate the deploy file that will be used

> npm install –g azure-cli

Next we install the yo hubot generator

> npm install –g yo generator-hubot

create a directory for your hubot. I have found that you should not initially name it “hubot”, as npm will fail with some of the package installs (specifically, the hubot package). Then lets start the hubot configuration

> mkdir myhubot

> cd myhubot

> yo hubot

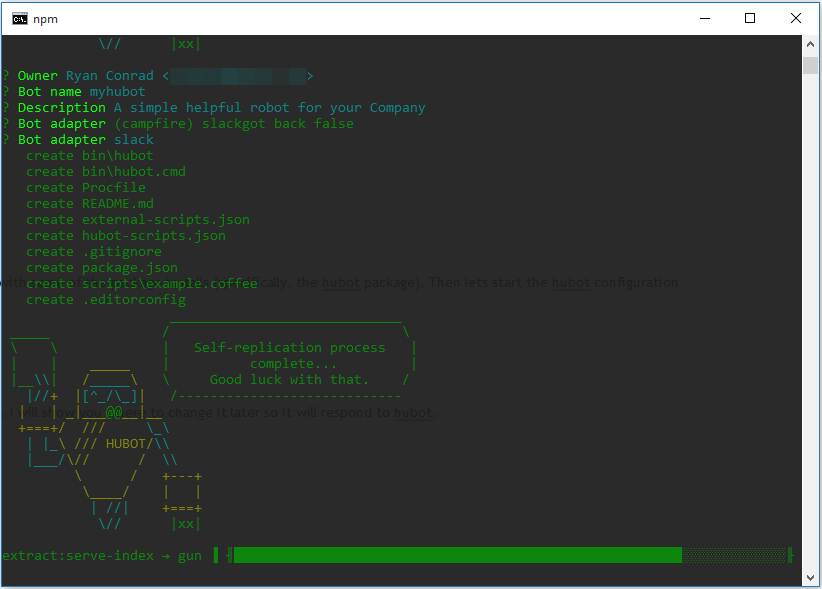
Now you will answer the question it asks to configure hubot. Again, I wouldn’t name it “hubot” when it asks. I will show you where to change it later so it will respond to hubot.

yohubot

Mine showed some error messages while running this, but still functioned correctly.

Now lets install the slack adapter

> npm install hubot-slack --save

next we need to create the azure deploy command.

> azure site deploymentscript –node

lets now make a couple tweaks to the hubot files:

first, open up external-scripts.json and remove

"hubot-heroku-keepalive",

"hubot-redis-brain"

if you want to use azure blob for the brain we can set that up now. while still in the external-scripts.json, add the line:

"hubot-azure-scripts/brain/storage-blob-brain"

Save the file and go back to the command prompt:

> npm install hubot-azure-scripts --save

You can go to https://github.com/hubot-scripts and find some other script that you may want to add

first install from npm:

> npm install [scriptname] --save

Then add it to the external-scripts.json


next we have to modify the deploy.cmd slightly. There is an issue with azure where it doesn’t like that hubot doesn’t have a file extension. So we copy the hubot file and add the coffee extension.

After :: 3. Install npm packages block add the following:

:: 4. Create Hubot file with a coffee extension
copy /Y "%DEPLOYMENT_TARGET%\node_modules\hubot\bin\hubot" "%DEPLOYMENT_TARGET%\node_modules\hubot\bin\hubot.coffee"

Since we created the hubot.coffee, we need to configure the server to use that:

> echo require('coffee-script/register'); > server.js & echo module.exports = require('hubot/bin/hubot.coffee'); >> server.js

you can either copy this and run in command prompt, or create a file called server.js and add the following:

require("coffee-script/register’);

module.exports = require("hubot/bin/hubot.coffee");

Here is when we can change the name of the hubot back to acutally be hubot.

Open ./myhubot/bin/hubot.cmd in notepad and change “myhubot” to “hubot”.

You may also want to edit the readme.md and replace “myhubot” with “hubot” as well.


At this point you should make your github repo for your hubot and then commit your changes to github. (Use your github and your own repo)

> git init

> git add .

> git commit -m "initial hubot commit"

> git remote add origin https://github.com/[your-user-name]/[your-hubot-origin]

> git push -u origin master


Azure setup

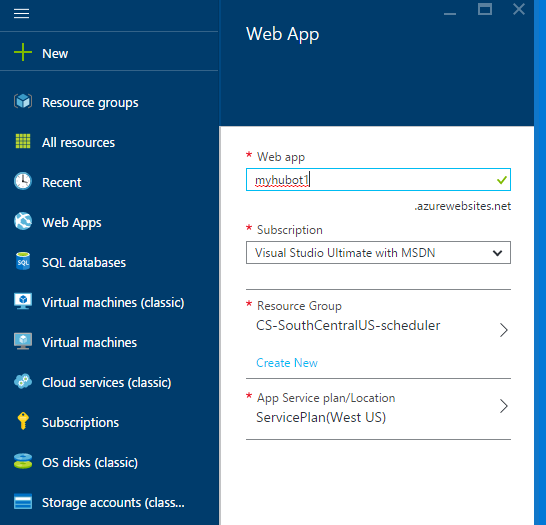
Login to your Azure portal and create a new Web App: (The name has to be unique)

webapp1


If you are using Azure blob for the brain, create the storage account as well.

blob1


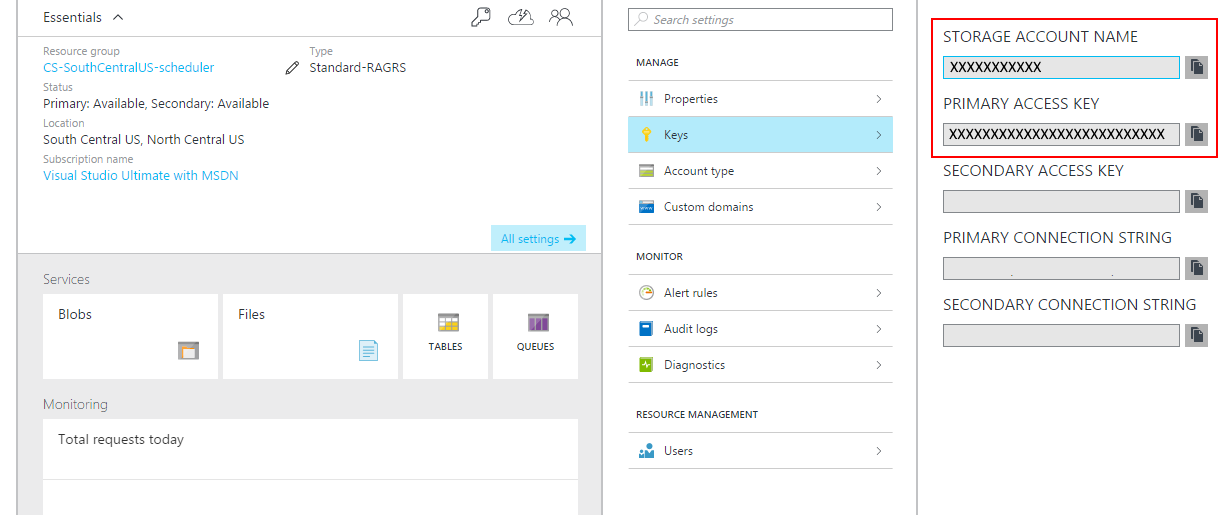
After the storage is created, we will need the Storage Account Name, and Primary Access Key. Copy these for use a little later:

keys

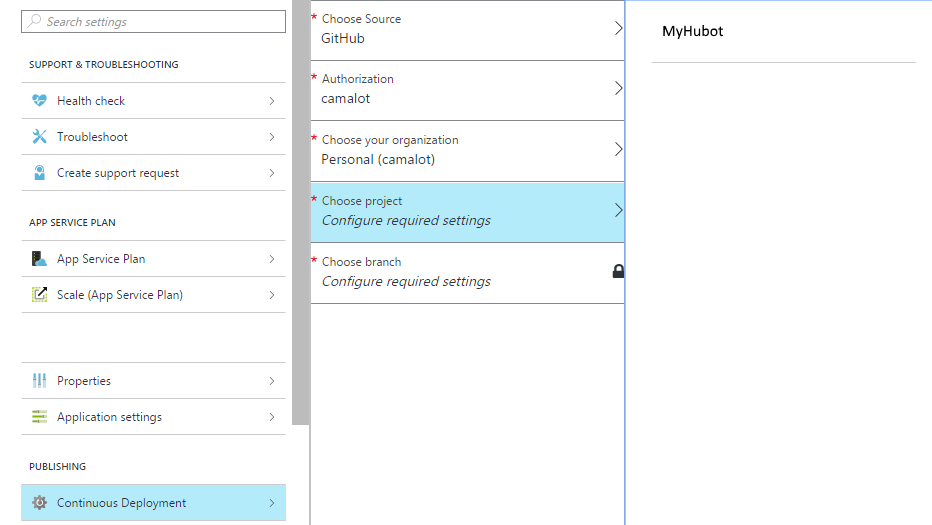
Go in to the settings for your newly created web app and click on “Continuous Deployment”. We are going to configure Azure Web Site to pull directly from the Github repo for the hubot configuration.

Choose Github as the provider and then authorize Azure to connect. Then choose your Hubot

cd


Finally we have to set up the environment variables that Hubot needs to function:

properties

You will create the following keys:

HUBOT_SLACK_TOKEN:  Your Slack Token for Hubot when you enable the integration

HUBOT_SLACK_TEAM:  myslack (from https://myslack.slack.com)

HUBOT_SLACK_BOTNAME: The name of your hubot

HUBOT_ADAPTER: slack

HUBOT_BRAIN_AZURE_STORAGE_ACCOUNT: The storage account name we saved from above

HUBOT_BRAIN_AZURE_STORAGE_ACCESS_KEY: The storage access token we saved from above


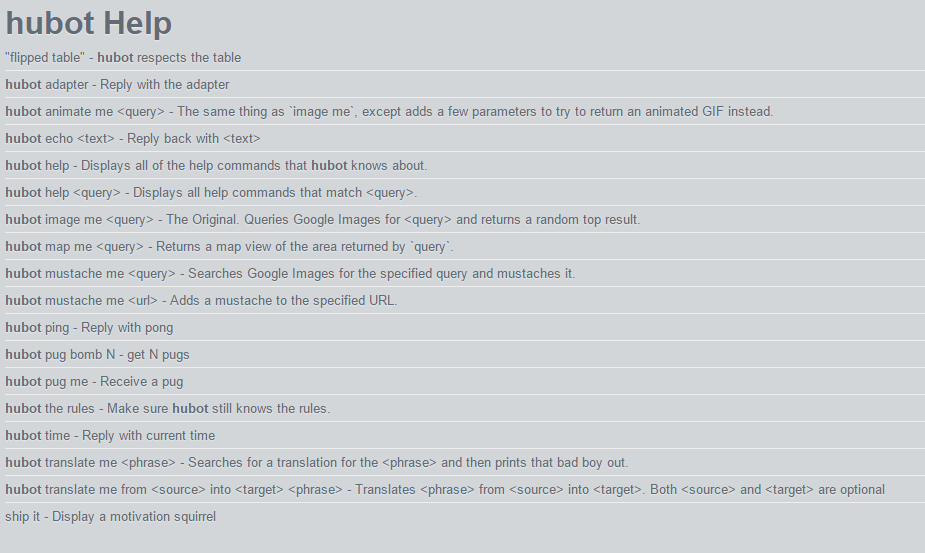
Go to your webapp to test that your hubot is working.

http://myhubot1.azurewebsites.net/hubot/help

help

Sometimes it doesn’t respond the first time, but if it continues to fail when requesting, there there may be an issue. Try running locally (you will have to remove the azure-blob when running local) and see if everything is working.

That’s about it. Enjoy!

Showing posts with label azure. Show all posts

Type 2 Diabetes Diagnosis

I won't go through all the details, but on December 26th, 2016, I was diagnosed with Type 2 Diabetes. As you probably expect, it means a drastic life-style change for me. I have to give insulin injections, and monitor blood glucose, as well as monitor the amount of carbohydrates that I consume. To help me track that information I found an application on Google Play called Diabetes:M (Play Store). The application is free, but ad supported. You can purchase the ad-free license for ~$9 or so, which I purchased as soon as I was sure it was the application that I wanted to use.

2017-01-11 04.04.33

This allows me to track everything that I need to be successful in controlling my diabetes. This includes information like my meals, my medications, blood pressure, insulin injections, etc. One of my favorite features of Diabetes:M is the ability for the application to sync the SQLite database, that contains all of the logged data, to a cloud storage provider like Dropbox. This, as a developer, got me thinking how I could leverage that so that I can provide my information to my wife so she is aware of what my current blood glucose level is.

To start this project I created an Express node application and put a copy of the SQLite database in the directory structure of the application. I then went to work on creating some SQL queries to pull information from the Diabetes:M database. To start, I queried my most recent glucose level.

dm

One of the important steps to make the data current was for me to find a way to detect when a new version of the database was saved to my Dropbox. To do this, I found an application (for windows) called Directory Monitor. There is a free version of the application, which is what I am currently using, as the free version fits all my needs. I configured the application to run a shell script when the SQLite database file is modified on my system, which happens every time I log information in the Android application.

dm-info

The shell script goes and extracts the dbz file, which is just a gzipped (or some other compression) SQLite file. It takes that extracted database file and puts it in the /data directory in the express application. It then does a git commit and git push of the git repository. This commit triggers a deploy in Azure. Within seconds of me taking my glucose level, the database is updated on Azure, so when my wife wants to check to see how I am doing, she can see the data in near real-time.

So when she opens the site on her phone she would see something like the following:


current-level


She can even see a history of all the events that I have entered into Diabetes:M


log


And, because I could, I added a dashboard with some charts

db1

This is just the beginning of what I have done. I have other things I want to add so my wife, and family, can support me in managing this so I can live a healthier life. Right now, the code for this is not publicly available because it is still very tied to my information and configuration. I will work towards getting this in a place that I can share the code so others can use this.


Some other ideas that I think will be fun, and useful:

  • Alexa Skill – Wife will be able to ask Alexa what my glucose is, and will respond with something like "about 32 minutes ago, Ryan's glucose was 132"
  • iOS/Android 'support' app to be able to receive push notifications when there is a reason for concern, like high, or low glucose levels.
  • More detailed reports and the ability to change the timespan of the data.
  • Support for other systems to monitor the database changes. I have multiple Raspberry PI's that are always running, one of them could monitor the database for changes in Dropbox and the rPi could sync the database.
  • Nightscout (CGM in the Cloud) – Integration / Support for Nightscout and all the work that the community has already done here.

How to Run Hubot on Azure Websites

I wanted to get Hubot working in our slack channels at work and I thought I would share the process I took to get it working and running on Azure Websites.


First, make sure you have nodejs installed

> choco install nodejs.install -y

Make sure npm is up to date

> npm install -g npm

At this point, I also installed coffee-script because the first time I tried running it, I got errors about coffee script

> npm install -g coffee-script

Install the azure-cli node modules to generate the deploy file that will be used

> npm install –g azure-cli

Next we install the yo hubot generator

> npm install –g yo generator-hubot

create a directory for your hubot. I have found that you should not initially name it “hubot”, as npm will fail with some of the package installs (specifically, the hubot package). Then lets start the hubot configuration

> mkdir myhubot

> cd myhubot

> yo hubot

Now you will answer the question it asks to configure hubot. Again, I wouldn’t name it “hubot” when it asks. I will show you where to change it later so it will respond to hubot.

yohubot

Mine showed some error messages while running this, but still functioned correctly.

Now lets install the slack adapter

> npm install hubot-slack --save

next we need to create the azure deploy command.

> azure site deploymentscript –node

lets now make a couple tweaks to the hubot files:

first, open up external-scripts.json and remove

"hubot-heroku-keepalive",

"hubot-redis-brain"

if you want to use azure blob for the brain we can set that up now. while still in the external-scripts.json, add the line:

"hubot-azure-scripts/brain/storage-blob-brain"

Save the file and go back to the command prompt:

> npm install hubot-azure-scripts --save

You can go to https://github.com/hubot-scripts and find some other script that you may want to add

first install from npm:

> npm install [scriptname] --save

Then add it to the external-scripts.json


next we have to modify the deploy.cmd slightly. There is an issue with azure where it doesn’t like that hubot doesn’t have a file extension. So we copy the hubot file and add the coffee extension.

After :: 3. Install npm packages block add the following:

:: 4. Create Hubot file with a coffee extension
copy /Y "%DEPLOYMENT_TARGET%\node_modules\hubot\bin\hubot" "%DEPLOYMENT_TARGET%\node_modules\hubot\bin\hubot.coffee"

Since we created the hubot.coffee, we need to configure the server to use that:

> echo require('coffee-script/register'); > server.js & echo module.exports = require('hubot/bin/hubot.coffee'); >> server.js

you can either copy this and run in command prompt, or create a file called server.js and add the following:

require("coffee-script/register’);

module.exports = require("hubot/bin/hubot.coffee");

Here is when we can change the name of the hubot back to acutally be hubot.

Open ./myhubot/bin/hubot.cmd in notepad and change “myhubot” to “hubot”.

You may also want to edit the readme.md and replace “myhubot” with “hubot” as well.


At this point you should make your github repo for your hubot and then commit your changes to github. (Use your github and your own repo)

> git init

> git add .

> git commit -m "initial hubot commit"

> git remote add origin https://github.com/[your-user-name]/[your-hubot-origin]

> git push -u origin master


Azure setup

Login to your Azure portal and create a new Web App: (The name has to be unique)

webapp1


If you are using Azure blob for the brain, create the storage account as well.

blob1


After the storage is created, we will need the Storage Account Name, and Primary Access Key. Copy these for use a little later:

keys

Go in to the settings for your newly created web app and click on “Continuous Deployment”. We are going to configure Azure Web Site to pull directly from the Github repo for the hubot configuration.

Choose Github as the provider and then authorize Azure to connect. Then choose your Hubot

cd


Finally we have to set up the environment variables that Hubot needs to function:

properties

You will create the following keys:

HUBOT_SLACK_TOKEN:  Your Slack Token for Hubot when you enable the integration

HUBOT_SLACK_TEAM:  myslack (from https://myslack.slack.com)

HUBOT_SLACK_BOTNAME: The name of your hubot

HUBOT_ADAPTER: slack

HUBOT_BRAIN_AZURE_STORAGE_ACCOUNT: The storage account name we saved from above

HUBOT_BRAIN_AZURE_STORAGE_ACCESS_KEY: The storage access token we saved from above


Go to your webapp to test that your hubot is working.

http://myhubot1.azurewebsites.net/hubot/help

help

Sometimes it doesn’t respond the first time, but if it continues to fail when requesting, there there may be an issue. Try running locally (you will have to remove the azure-blob when running local) and see if everything is working.

That’s about it. Enjoy!