Showing posts with label android. Show all posts

Saturday, April 2, 2016

Droid Explorer working on Non-Rooted Device

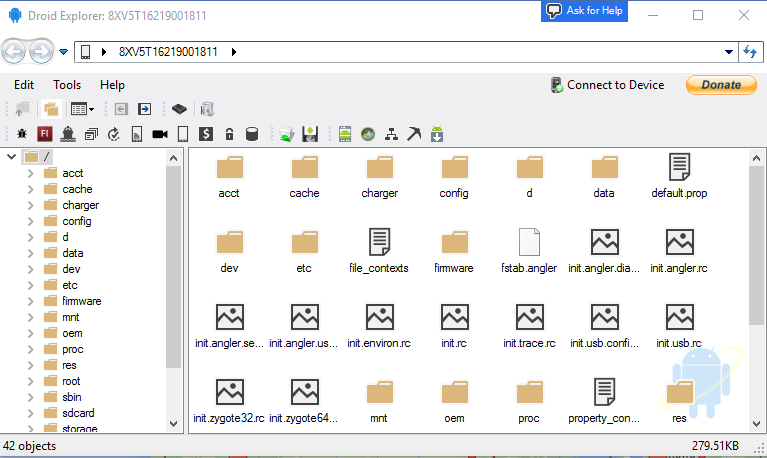
I have started doing some work on removing the dependency on rooted device, specifically, busybox. This is no where near complete, and is buggy, at best. As you can see from the screenshot, you can see most of the folders, but if you try to go in to some of them, you will not see any files. This is my Nexus 6P, which is not rooted, connected to Droid Explorer. I do not have busybox or anything else special installed.

no-root

It doesn’t look like much, but this is a big change to the code base. I have been removing code from the Core.CommandRunner, the code that handles 99% of the communication between your computer and your device. Instead it is making use of madb, which minimizes the need for adb, and only uses it to act as the adb server. While the old code used adb as the server, but also depended on the adb client to do the communication to the device. Madb is the client, and it does all the communication to the adb server.


No binaries available yet, as I stated, this is very early. The code will be available on the Droid Explorer Github soon.

Sunday, January 27, 2013

How To: Manually Flash ClockworkMod Recovery Touch on Samsung Galaxy Note II

You can easily flash the Touch version of ClockworkMod from ROM Manager for an in app purchase of around $3.00. But you can manually do it and save a couple bucks if you want to try the touch version before you buy it.

  1. Download the touch version for your device from the ClockworkMod websiteimage
  2. rename the downloaded file to recovery.img
  3. copy the renamed file to /sdcard/recovery.img
  4. open a terminal window (or adb shell)
  5. su in the shell to gain root access
  6. run the following command:

    # dd if=/sdcard/recovery.img of=/dev/block/platform/dw_mmc/by-name/RECOVERY
  7. reboot the device in to recovery and enjoy

Sunday, January 20, 2013

Getting Mount Manager working with Android 4.2

This post May Not apply to you but I hope it helps.

I have had some people that have reported issues connecting to a share with Mount Manager on a 4.2 device.

First, make sure you have the required modules for your kernel. This post will be using CyanogenMod 10.1 as the reference, but your ROM may differ and YMMV.

In CM10.1 you have to load 3 modules to get cifs to work correctly. cifs.ko depends upon dns_resolver and md4 modules. They have to be loaded before cifs.ko.

modules

Once you have these modules loaded you should be able to mount your shares. If you are still having issues try looking at this post on XDA. It seems there is an issue with some builds of busybox that it needs the unc option added to the connection.

You can add a new option when creating a mount point and select custom. Then enter “unc” as the name. For the value you will enter the same path that you use for the network share, except you have to use “\” instead of “/”. And you have to escape them. So you need to use 2 of them for every one you enter.

unc

Saturday, January 19, 2013

Enable Soft-Keys on Samsung Galaxy Note 2

device-2013-01-19-014319I wanted to enable the soft-keys on my Samsung Galaxy Note 2 after switching to the new nightly builds of CyanogenMod 10.1.

I found that it is actually rather easy to turn them on. It just requires modifying the build.prop with the following:

qemu.hw.mainkeys=0


If you want to disable them later just change it to:


qemu.hw.mainkeys=1


After you modify the build.prop you have to reboot for the changes to take affect.


This change will turn on the soft-keys, but it does not disable the hardware keys. But you can disable them too. You have to open /system/usr/keylayout/Generic.kl and comment out the following by added a '#' to the beginning of the line.


# key 158	BACK
# key 139 MENU


The home key is located in /system/usr/keylayout/gpo-keys.kl


# key 172	HOME	WAKE


To turn these back on just remove the '#' and reboot.

Wednesday, August 29, 2012

Introducing the .ABEX File Format

As I have said in my last post, Droid Explorer will support the Android Backup (.ab) file format. But I also mentioned that Droid Explorer will extend the Android Backup file format so a backup can be tied to a specific device. This file format will be ABEX (Enhanced Android Backup). The file format is simple and just adds an additional header block to store the information.

	ENHANCED ANDROID BACKUP\n
[DEVICE ID]\n
[Droid Explorer Version]\n
[ABEX Version]\n
$$$ ENHANCED ANDROID BACKUP $$$\n

The first line is the Magic line. Next is the Device ID that the backup is tied to. This is value is a string. If the device is not connected, then an error message should be displayed notifying the user that the backup is tied to a specific device and that device could not be found. Next is the version of Droid Explorer (or the application that created the ABEX). This value is a string. Next is the Specification Version of ABEX (Current = 1). This value is an integer. The final line is an indicator showing the end of the ABEX header.


Following the ABEX Header should be the normal Android Backup content starting with the Android Backup Magic line.


I have a modified version of ABE that Droid Explorer will use to unpack these files and forked it on github.


Visually, these files will (at least for now) look just like a normal Android Backup. The difference will be the file extension and how Droid Explorer will handle them. If it is a “Basic” Android Backup, then the user will be prompted with a device selection when attempting to restore. Also, there will be an option to convert a “Basic” Android Backup to an “Enhanced” version. Also, Droid Explorer will allow the conversion of an “Enhanced” version to a “Basic” version.

Droid Explorer 0.8.8.7 Backup Feature

Droid Explorer 0.8.8.7 will be released in just a few days and will have some new features that you may find useful if you have a 4.x device.

The biggest feature is the ability to backup your device (does not require root). If you do not have a 4.x device connected, you will not be able to take advantage of this method of backup.

image

Along with that feature comes some additional features on top of it. A central location for your Android Backup files (*.ab). They will be stored in a folder in your user profile called “Android Backups”. This folder has a special folder applied to it so it is easy to tell where your backups are located.

image

Inside this folder there will be a folder for each device you use with Droid Explorer to create backups. The folder name is the “ID” of the device or the “Name” of the device if you changed it in the settings. Here you will see I have a couple backups in the folder Killik (the name I gave one of my devices).

image

But what can you do with these backups? Well, you can restore your device with them, of course. Just double click on one of the Android Backup (.ab) files and select the device you want to restore to. Make sure you restore to the correct device. I am not responsible for any disasters restoring may cause, including, but not limited to bricking your device, cat jumping of a cliff, house burning down. I may look in to extending the backups a bit, so Droid Explorer knows what device they came from, but that is not in this version.

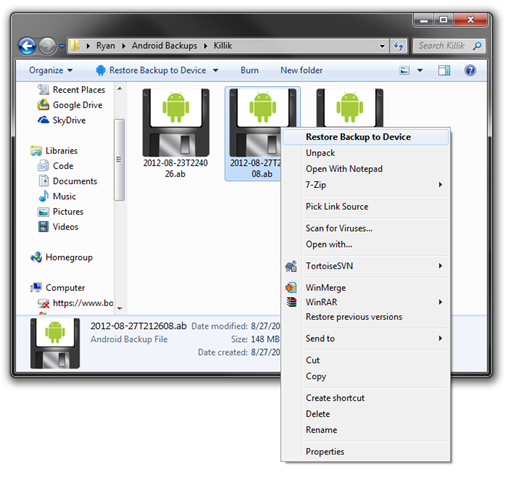
If you right click on the Android Backup, you will also be given the option to restore the backup to a device. But, look closer at the picture below… There is also an option to unpack the backup file. This will turn the Android Backup in to a TAR Archive. Then you can get to the inner contents of the backup, like the Application Files if you choose to include those in your Backup.

image 

Another feature that will be added in the future is the ability to view backups from within Droid Explorer. If you have Droid Explorer v0.8.8.6, you will get a notification when you open Droid Explorer after the new version has been released. Keep your eye out for this version and future versions.

As always, if you have ideas for Droid Explorer, submit a Feature Request.

Saturday, March 3, 2012

Windows 7 and CIFS Out Of Memory Error

I have had a few users contact me about getting errors when mounting a share from Windows 7 with Mount Manager. This error was some type of “out of memory” error.

When you try to mount you see the following error:

mount error(12): Cannot allocate memory
Refer to the mount.cifs(8) manual page (e.g.man mount.cifs)

The error reports the following in Event Viewer:

Source: srv
Event ID: 2017
Level: Error
The server was unable to allocate from the system nonpaged pool because the server reached the configured limit for nonpaged pool allocations.

One user, after much research, found the solution. According to an article he found, you need to tell windows that it will be used as a file server and that it should allocate the memory that it needs to do so.

To do this, you have to set the following value in the registry to ‘1’.

HKLM\SYSTEM\CurrentControlSet\Control\Session Manager\Memory Management\LargeSystemCache

Also you have to set the following value in the registry to ‘3’.

HKLM\SYSTEM\CurrentControlSet\Services\LanmanServer\Parameters\Size

Sunday, December 4, 2011

Visual Studio Achievements for Android

feature

View Visual Studio Achievements right on your Android de vices. Don’t let those Windows Phone users have all the fun.

  • View current leaderboard standings
  • View user information on all completed and started achievements
  • View information on each achievement

Once the service is fully launched, other features will come. Including the ability to monitor your achievements and progress, search and view other users achievements, and mark users as a favorite and easily monitor their progress to see if they are catching up to your score.

InlineRepresentation2c1e7a5c-b931-43ad-ab11-d27038087c3b[2]

Monday, November 14, 2011

Connecting to Nook Color w/ CyanogenMod7 via ADB over USB

nook-colorThe Nook Color is a great device, especially when CyanogenMod is installed on the device. The only issue I was having with the device, I was unable to connect to the device via ADB over USB.

I followed the steps here, but was still unable to see the device via ADB. After looking through the “fix” that was linked from XDA, I noticed that it modifies, or creates a file in %USERPROFILE%\.android\ called adb_usb.ini. That file contains vendor id’s for the devices and it contains 0x2080. As I was digging around looking to fix this issue, I noticed that in the root of my Android SDK installation there is a folder called .android. In that folder, just like the one in my user profile, there is a file called adb_usb.ini. This file is empty, except a couple comments describing the file. I added the 0x2080 to this file, then I restarted adb by doing an adb kill-server, then an adb start-server.

Now when I do adb devices, I can see the Nook Color and I can perform any adb or shell commands on the device via adb over USB.

Sunday, November 13, 2011

New version of Mount Manager available

I published a new version of Mount Manager last night that addresses some issues along with adding new functionality.

  • Fixed bug when mounting / unmounting a share that contains a “space”
  • Fixed bug when mounting / unmounting when mount point contains a “space”
  • Fixed bug if the share path or mount point contains a trailing slash
  • Changed the default mount point “base” to /sdcard/cifs/ instead of /mnt/cifs/. This eliminates the need to remount / as read/write. If you have mounts already defined to /mnt/cifs/, I suggest that you move them to /sdcard/cifs/ otherwise you will get errors when mounting and you will manually have to remount / as read/write.
  • Added a built-in file/folder browser used for selecting the mount point or browsing for module files to load.
  • Added ability to browse for network shares. Some machines are not browsable, depending on how the shares are set up. In these cases, you will just have to manually enter the share path.
  • Updated the admob library to the latest version.

mm-nui-1 mm-nui-2 mm-nui-3 mm-nui-4 mm-nui-5 mm-nui-6

Friday, August 12, 2011

Getting GPS working again on the Vibrant w/ CM7 nightlies

I love CyanogenMod and I thank all of them for their hard work that they do for basically nothing except the “thrill”. I have been using that since the very first version on my HTC ADP1. Then I bought the Samsung Galaxy S Vibrant from T-Mobile and CM was not available for the device. I stuck with the “Stock” Samsung TouchWiz UI that I made some tweaks to here and there to get a better experience for myself. I did things like rooting the device, adding the CarDock, removing the crap software that I don’t ever use, removed the “WorldClock” and added the stock Alarm Clock and other things here and there.

The GPS on this device has always been a topic of discussion, as there were issues with it from launch. It would take up to 10 minutes or more, to get a lock, and once you got the lock, you would probably lose it. There were people much smarter then me that found ways to make the GPS usable on the Stock TouchWiz UI.

After some time, Team Whiskey released the Bionix ROM. This was/is a ROM still based off the TouchWiz version of Android at its core, but was a better experience as it included functionality that was not in stock TouchWiz, and it didn’t include the bloatware. The biggest thing that Team Whiskey brought to the Vibrant with Bionix was Voodoo. Now, I know they did not create Voodoo, and other ROMs had support too, but I am just babbling about what Bionix did for me. I ran this ROM for some time, and a mod that I created that brought the Gingerbread keyboard with working the hepatic feedback to FroYo ROM is even included in the distribution. But there was still something missing for me.

I believe, at least for me, that the Vanilla Android is a better user experience, and the CM modifications, is that experience, plus more for your “die-hard” android users. I would go to the CyanogenMod website often to see if there was any developments on getting a build of CM running on the Vibrant. Now, you may read this and say “It ran on the Vibrant for a while”, and that is true, but the steps needed to install it on the device was a pain in the ass, not to mention that there were a lot of things that were not working. These are the things that kept me on Bionix. Then the CM team that work on the Vibrant (and other Galaxy S devices too) got the install process to be a lot less of a pain. At that time, I decided to give it a try, and I knew that GPS, among some other bugs existed.

Then shortly after I started flashing these unofficial builds of CM, the nightlies started. At the time of this post, they have over 75 nightlies, but there are still some issues with it, including GPS. Which brings me to the actual title of this post. I found this thread over on XDA by stricklyrude27. He put together a set of scripts and files and steps that were created by other people (see thread for their credit) and placed them in to a single update.zip package.

I am running CM7.1-N76 with the GPSFix v1.4 and GPS works great. I get a lock in just a couple of seconds. If you are running CM7 on your Vibrant, head over to the thread and give it a try, at least until an official CM7 solution comes about.

Thank you to all that contribute to the CyanogenMod and especially to the SGS Team, also thanks to all that were involved in getting this fix working too. The android community is great and love that just about always, a solution to any issue is found.

Thursday, August 11, 2011

Logitech Revue and Acoustic Research XSight Touch

Yesterday was a good gadget day for me. Both my Logitech Revue and Acoustic Research XSight Touch arrived in the mail.

logitech-revue-8So far I like the Revue. $99 is a much better price for that device, I don't know if I would have been too happy if I paid the $249 for it. What I really want is ADB access to it, or I would settle for the Android Market. It needs "more" apps. My TV has more apps then the Revue, but I really like Chrome and the Logitech Media Player (I think its just a DLNA client). It works well, I watched a couple videos streamed from my PC to the Revue and used TVersity to do the transcoding.

The Netflix app is what you would expect, actually, it is the exact same app that is on my Vizio TV. The gallery app will pull down your images from Picasa.

I also like the Queue, but I will probably use it more for NetCasts like TWiT and TWiG. The Queue does fall a little short when it comes to searching for NetCasts. There is no way to manually type in the RSS feed in the Queue, and some that I searched for, like TWiG, would only give me the audio feed. You can get around this limitation by opening up Chrome and visit the NetCast site and select the RSS icon in the Search bar, or open the RSS feed directly if it is available. This will open up the Queue subscription option screen.

I am very eager for the Market to come to the Revue. I can’t wait to start writing Android applications for this and other Google TV enabled devices.

I still have a lot of playing around to do with the Revue, but so far, I am of the opinion that it is well worth the $99. If you don't have one, and thought about getting one before, I say go get it now.


acoustic-research-xsight-charging-cradleThat brings me to the AR XSight Touch Universal Remote. I got the XSight Touch off Woot.com when they had it on there about a week or so ago. It was a good deal, they retailed for about $250, but Amazon has them now for about $75. Woot had them for $40 with shipping.

The remote will control up to 18 different devices and has a 2.2" Color LCD touch display. It has built in 433 MHz RF but requires an accessory to make use of that. The buttons are back-lit and are easy to see in the dark. The remote as an accelerometer of some sort, as it will automatically turn on the display and key lights when the device is picked up. It comes with a lithium-ion battery and a dock for charging the remote. The remote can "learn" from other IR remotes, programmed via the remote itself, or you can program it using an online tool with a huge collection of devices in their database.

Setup was pretty easy, I did one device from the remote, and 2 more from the website. The website tool did seem a little slow, but I hope it was because all the "wooters" were trying to setup their devices. The website saves your configuration so if the remote loses its configuration, it can be easily restored. You can also setup "key macros" so you can easily turn on/off a range of devices with one key press. It can even control some home automation stuff, like security systems, lighting, etc. I have mine set up to control my Vizio TV, Xfinity HD Cablebox and Xbox 360.

Overall, I am happy with the XSight, and I will be using that as my main remote for the TV/Cable, and the Revue keyboard will be when I want to actually make use of the Google TV functionality.

Logitech Revue w/ Google TV - http://amzn.to/pulB7a
XSight Touch Universal Remote - http://amzn.to/oFHrNE
Wednesday, May 25, 2011

Droid Explorer 1.0 on Non-Rooted Devices

I hit somewhat of a milestone today. I got the Droid Explorer 1.0 branch to build. Not only that, about 90% of the communication from Droid Explorer and the device is now done through MadBee. That’s the Managed Android Debug Bridge, if you were not aware. MadBee is basically an enhanced port of the Android Debug Bridge library that ships as part of the Android SDK. There are other features that I have added to it, like the ability to check if the device has BusyBox, or if the device can execute SU commands.

MadBee is available from NuGet, but is still very young. I occasionally notice some issues with how things work while using it as the “power” behind Droid Explorer, and go in and make some modifications. But I always update on NuGet, but that means I may update there often.

What, exactly does MadBee mean for Droid Explorer? Well, I am glad I asked. MadBee is the link between the device and Droid Explorer. Since it is based off the original Android Debug Bridge, it was initially meant for non-rooted devices. It has always been my intentions, and goal, to have Droid Explorer working on ALL devices, not just rooted ones. MadBee helps make that happen. Now, MadBee does not circumvent any security that is already in place on your device, so if you don’t have a rooted device, you will not be able to perform any tasks that would require root, like remount /system with read-write.

There is still a lot of work to be done before this build of Droid Explorer will be ready for the public, but here is a teaser of Droid Explorer connected to a non-rooted Galaxy Tab.

de-on-unrooted-gtab

Tuesday, May 17, 2011

Droid Explorer 0.8.8.2 Released

sgstabshotdeviceselectiondialogI released an update to Droid Explorer today that addresses some needed issues.

  • New Device selection dialog
  • all assemblies are now signed again
  • fixed the "runner" so apk's can now be installed from the machine (along with the other plugins)
  • when upgrading, and using an existing SDK, the value will now be pulled from the registry, if it exists.
  • fixed bug in uninstall that would remove the sdk, even if you used an existing sdk
  • removed anda.pk plugin since the site is dead.
  • added a link in the bootstrapper (installer) to download the sdk.
  • refactored some strings to the external resources files in the bootstrapper (installer)
  • changed the reboot commands to use the adb commands, not the shell commands
  • fixed rm command to now use busybox as it was passing args that are not supported on the "stock" rm command.
  • added the sph-p100 (Sprint Samsung Galaxy Tab) device icon


Download Droid Explorer v0.8.8.2

CyanogenMod 7 on Galaxy S Vibrant

CM7_256_072The nightly builds for CyanogenMod 7 for Samsung Galaxy S line of devices is now available via Rom Manager. It is now a “Single Update” install, 2 if you want to add gapps.

Here are some of the issues I had when doing the install, and how I worked around them.

  • Follow the instructions Here and Read the FAQ here. This is just a “helper” for some of the issues I had, not a replacement or step by step.
  • You will need to be able to get in to the Recovery via the 3 Button Method. If you cannot, then you will have problems.
  • Before you start with ROM Manager, you need to download the gapps package and place it on the internal sdcard. You cannot use ROM Manager to install the gapps, it will not work.
  • The easy part is installing CM7 from ROM Manager. Open up Rom Manager and download the CM ROM
  • ROM Manager will now download the ROM. Once completed, it will prompt you to wipe data and cache and backup. You should do them ALL. Then Click OK.
  • The device will reboot and it will install the CM package. Be patient, it can take a while.
  • Once the device is rebooted you will want to turn the device off. DO NOT USE ROM Manager, or any other shiny thing, to get in to the recovery, it will not work correctly.
  • Power the device back on using the 3 Button Recovery method. Hold down Vol+ & Vol- & Power. Once you see the “Vibrant” Screen release ONLY THE POWER button.
  • Now that you are in Clockwork, select install package from sdcard and select the gapps package you downloaded before you started.
  • Reboot your device and enjoy.
  • Update: If your PC does not recognize your device any more, you need to install the Google USB Drivers.

I forgot how much I missed using AOSP + the things that the CM team adds to the party. Being stuck using TouchWiz for so long, it is like getting a new phone again. Even if you run ROMs like Trigger or Bionix, you are still stuck with the TouchWiz additions.

Thanks TeamHackSung, my Galaxy S is happy now.

Friday, April 22, 2011

Droid Explorer 0.8.8.0 Released

explorer-viewLast night I released a new version of Droid Explorer that addresses some major issues that were introduced with the latest versions of the SDK.

  • Fixed the issue with the latest android SDK using “platform-tools” directory instead of “platforms/android-{platformversions}/tools”.
  • Fixed the screen shot tool to support newer devices (some are now using 32bpp RGB, instead of 16bpp RGB565)
  • Fixed an issue with the Bart plugin license not being detected on the device.
  • Fixed the console not working on some devices.
  • Added Device icons for the LG G2X and Samsung Galaxy S variants.
  • The Google USB drivers have been removed from the installer
  • Use existing SDK is now the default and recommended option
  • Other minor fixes

Download Droid Explorer 0.8.8.0

As always, there are x86 and 64 bit versions available.

The Standalone version is an “Offline Installer” where the other can download additional files (if you are not using an existing SDK).

The last release of Droid Explorer (0.8.7.2) has ~139,000 downloads since August 21 2010, exactly eight months ago. The plan is for more releases of Droid Explorer, in much shorter time frames again. So lets see if the 0.8.8.0 can exceed the number of downloads before the next release (I doubt it will happen Smile)

Sunday, March 20, 2011

Ad-Blocking in Apps is Piracy

I recently received some negative feedback on Mount Manager in the Android Market regarding my strict identification of ad-blocking applications.

The user said:

While I understand where the dev is coming from, the ad blocking restriction on this app is ridiculous. Ryan Conrad needs to understand that he is only encouraging piracy in his own app. Apps like this hurt the dev community for android.

This is not the first time that someone has complained about having to remove their ad-blocking software in order to use Mount Manager. Also keep in mind, this restriction is ONLY in place on the free version, if you purchase a license, you can use ad-blockers if you choose.

I feel very strongly against the use of ad-blocking, especially in applications. The ads that are displayed, potentially, generate revenue for the developer. If you have software that blocks these advertisements, you are preventing the developer to earn revenue, and thus committing piracy.

You probably completely disagree with me. You think ads in applications are annoying and get in the way and you never click on them any how, right?

Ok, well, Mount Manager, like many other applications, offers an ad free version, that also includes other features. But guess what, it isn’t free! I understand that you don’t want to see the ads, even if you never plan on clicking on them, and I offer a way for that to happen, while still allowing me, as the developer, to earn some revenue from the application. Remember back in the day, you had NetZero (it was actually free at one time), a free internet service provider. But guess what, they loaded advertisements up on your screen that were there while you were connected to their service. If you didn’t want to see the ads, guess what you had to do, that’s right, you had to pay for internet service.

So, that is my stance on ad-blocking applications for use with applications. I don’t expect it to change either. As long as I write applications, that display advertisements, I will have code that blocks the ad-blockers… I actually think it is sort of funny that people are mad that I have an “ad-blocker blocker”.

Saturday, February 26, 2011

Mount Manager License

The $2.99 price for Mount Manager License was originally just a discounted price for the first 100 sales. I have decided to extend this sale price indefinitely. This price seems very far, and a good price point. So the permanent price of Mount Manager License is $2.99.

I would like to thank everyone that has reported any issues in Mount Manager and helped make it a better product. You are the reason that the product is keeping this discounted price.

Thursday, January 13, 2011

Mount Manager + Locale / Tasker

The latest version, just published on the Android Market contains a new feature for licensed users. You can now use Locale / Tasker to automate the mounting or unmounting of your shares.

By setting up your conditions, like using the Wifi Connection plug-in, you can set shares to mount when you are connected to a specific wifi network, or unmount others.

Mount Manager Mount Manager License

The license is currently available for $2.99 for the first 100 sold. After that, the regular price of the license is $4.99.

Wednesday, January 12, 2011

Mount Manager License on Sale

The Mount Manager License that removes the advertisements from the application, plus will enable the Locale/Tasker plug-in once completed, is now on sale in the android market.

Mount Manager Mount Manager License

The price of the license is $4.99, but for the first 100 people that purchase the license it is available at a discounted price of $2.99. The license will guarantee that you have access to all the features in Mount Manager.

The application is fully functional as it is, but the license will enable other features, plus remove the ads.

Showing posts with label android. Show all posts

Droid Explorer working on Non-Rooted Device

I have started doing some work on removing the dependency on rooted device, specifically, busybox. This is no where near complete, and is buggy, at best. As you can see from the screenshot, you can see most of the folders, but if you try to go in to some of them, you will not see any files. This is my Nexus 6P, which is not rooted, connected to Droid Explorer. I do not have busybox or anything else special installed.

no-root

It doesn’t look like much, but this is a big change to the code base. I have been removing code from the Core.CommandRunner, the code that handles 99% of the communication between your computer and your device. Instead it is making use of madb, which minimizes the need for adb, and only uses it to act as the adb server. While the old code used adb as the server, but also depended on the adb client to do the communication to the device. Madb is the client, and it does all the communication to the adb server.


No binaries available yet, as I stated, this is very early. The code will be available on the Droid Explorer Github soon.

How To: Manually Flash ClockworkMod Recovery Touch on Samsung Galaxy Note II

You can easily flash the Touch version of ClockworkMod from ROM Manager for an in app purchase of around $3.00. But you can manually do it and save a couple bucks if you want to try the touch version before you buy it.

  1. Download the touch version for your device from the ClockworkMod websiteimage
  2. rename the downloaded file to recovery.img
  3. copy the renamed file to /sdcard/recovery.img
  4. open a terminal window (or adb shell)
  5. su in the shell to gain root access
  6. run the following command:

    # dd if=/sdcard/recovery.img of=/dev/block/platform/dw_mmc/by-name/RECOVERY
  7. reboot the device in to recovery and enjoy

Getting Mount Manager working with Android 4.2

This post May Not apply to you but I hope it helps.

I have had some people that have reported issues connecting to a share with Mount Manager on a 4.2 device.

First, make sure you have the required modules for your kernel. This post will be using CyanogenMod 10.1 as the reference, but your ROM may differ and YMMV.

In CM10.1 you have to load 3 modules to get cifs to work correctly. cifs.ko depends upon dns_resolver and md4 modules. They have to be loaded before cifs.ko.

modules

Once you have these modules loaded you should be able to mount your shares. If you are still having issues try looking at this post on XDA. It seems there is an issue with some builds of busybox that it needs the unc option added to the connection.

You can add a new option when creating a mount point and select custom. Then enter “unc” as the name. For the value you will enter the same path that you use for the network share, except you have to use “\” instead of “/”. And you have to escape them. So you need to use 2 of them for every one you enter.

unc

Enable Soft-Keys on Samsung Galaxy Note 2

device-2013-01-19-014319I wanted to enable the soft-keys on my Samsung Galaxy Note 2 after switching to the new nightly builds of CyanogenMod 10.1.

I found that it is actually rather easy to turn them on. It just requires modifying the build.prop with the following:

qemu.hw.mainkeys=0


If you want to disable them later just change it to:


qemu.hw.mainkeys=1


After you modify the build.prop you have to reboot for the changes to take affect.


This change will turn on the soft-keys, but it does not disable the hardware keys. But you can disable them too. You have to open /system/usr/keylayout/Generic.kl and comment out the following by added a '#' to the beginning of the line.


# key 158	BACK
# key 139 MENU


The home key is located in /system/usr/keylayout/gpo-keys.kl


# key 172	HOME	WAKE


To turn these back on just remove the '#' and reboot.

Introducing the .ABEX File Format

As I have said in my last post, Droid Explorer will support the Android Backup (.ab) file format. But I also mentioned that Droid Explorer will extend the Android Backup file format so a backup can be tied to a specific device. This file format will be ABEX (Enhanced Android Backup). The file format is simple and just adds an additional header block to store the information.

	ENHANCED ANDROID BACKUP\n
[DEVICE ID]\n
[Droid Explorer Version]\n
[ABEX Version]\n
$$$ ENHANCED ANDROID BACKUP $$$\n

The first line is the Magic line. Next is the Device ID that the backup is tied to. This is value is a string. If the device is not connected, then an error message should be displayed notifying the user that the backup is tied to a specific device and that device could not be found. Next is the version of Droid Explorer (or the application that created the ABEX). This value is a string. Next is the Specification Version of ABEX (Current = 1). This value is an integer. The final line is an indicator showing the end of the ABEX header.


Following the ABEX Header should be the normal Android Backup content starting with the Android Backup Magic line.


I have a modified version of ABE that Droid Explorer will use to unpack these files and forked it on github.


Visually, these files will (at least for now) look just like a normal Android Backup. The difference will be the file extension and how Droid Explorer will handle them. If it is a “Basic” Android Backup, then the user will be prompted with a device selection when attempting to restore. Also, there will be an option to convert a “Basic” Android Backup to an “Enhanced” version. Also, Droid Explorer will allow the conversion of an “Enhanced” version to a “Basic” version.

Droid Explorer 0.8.8.7 Backup Feature

Droid Explorer 0.8.8.7 will be released in just a few days and will have some new features that you may find useful if you have a 4.x device.

The biggest feature is the ability to backup your device (does not require root). If you do not have a 4.x device connected, you will not be able to take advantage of this method of backup.

image

Along with that feature comes some additional features on top of it. A central location for your Android Backup files (*.ab). They will be stored in a folder in your user profile called “Android Backups”. This folder has a special folder applied to it so it is easy to tell where your backups are located.

image

Inside this folder there will be a folder for each device you use with Droid Explorer to create backups. The folder name is the “ID” of the device or the “Name” of the device if you changed it in the settings. Here you will see I have a couple backups in the folder Killik (the name I gave one of my devices).

image

But what can you do with these backups? Well, you can restore your device with them, of course. Just double click on one of the Android Backup (.ab) files and select the device you want to restore to. Make sure you restore to the correct device. I am not responsible for any disasters restoring may cause, including, but not limited to bricking your device, cat jumping of a cliff, house burning down. I may look in to extending the backups a bit, so Droid Explorer knows what device they came from, but that is not in this version.

If you right click on the Android Backup, you will also be given the option to restore the backup to a device. But, look closer at the picture below… There is also an option to unpack the backup file. This will turn the Android Backup in to a TAR Archive. Then you can get to the inner contents of the backup, like the Application Files if you choose to include those in your Backup.

image 

Another feature that will be added in the future is the ability to view backups from within Droid Explorer. If you have Droid Explorer v0.8.8.6, you will get a notification when you open Droid Explorer after the new version has been released. Keep your eye out for this version and future versions.

As always, if you have ideas for Droid Explorer, submit a Feature Request.

Windows 7 and CIFS Out Of Memory Error

I have had a few users contact me about getting errors when mounting a share from Windows 7 with Mount Manager. This error was some type of “out of memory” error.

When you try to mount you see the following error:

mount error(12): Cannot allocate memory
Refer to the mount.cifs(8) manual page (e.g.man mount.cifs)

The error reports the following in Event Viewer:

Source: srv
Event ID: 2017
Level: Error
The server was unable to allocate from the system nonpaged pool because the server reached the configured limit for nonpaged pool allocations.

One user, after much research, found the solution. According to an article he found, you need to tell windows that it will be used as a file server and that it should allocate the memory that it needs to do so.

To do this, you have to set the following value in the registry to ‘1’.

HKLM\SYSTEM\CurrentControlSet\Control\Session Manager\Memory Management\LargeSystemCache

Also you have to set the following value in the registry to ‘3’.

HKLM\SYSTEM\CurrentControlSet\Services\LanmanServer\Parameters\Size

Visual Studio Achievements for Android

feature

View Visual Studio Achievements right on your Android de vices. Don’t let those Windows Phone users have all the fun.

  • View current leaderboard standings
  • View user information on all completed and started achievements
  • View information on each achievement

Once the service is fully launched, other features will come. Including the ability to monitor your achievements and progress, search and view other users achievements, and mark users as a favorite and easily monitor their progress to see if they are catching up to your score.

InlineRepresentation2c1e7a5c-b931-43ad-ab11-d27038087c3b[2]

Connecting to Nook Color w/ CyanogenMod7 via ADB over USB

nook-colorThe Nook Color is a great device, especially when CyanogenMod is installed on the device. The only issue I was having with the device, I was unable to connect to the device via ADB over USB.

I followed the steps here, but was still unable to see the device via ADB. After looking through the “fix” that was linked from XDA, I noticed that it modifies, or creates a file in %USERPROFILE%\.android\ called adb_usb.ini. That file contains vendor id’s for the devices and it contains 0x2080. As I was digging around looking to fix this issue, I noticed that in the root of my Android SDK installation there is a folder called .android. In that folder, just like the one in my user profile, there is a file called adb_usb.ini. This file is empty, except a couple comments describing the file. I added the 0x2080 to this file, then I restarted adb by doing an adb kill-server, then an adb start-server.

Now when I do adb devices, I can see the Nook Color and I can perform any adb or shell commands on the device via adb over USB.

New version of Mount Manager available

I published a new version of Mount Manager last night that addresses some issues along with adding new functionality.

  • Fixed bug when mounting / unmounting a share that contains a “space”
  • Fixed bug when mounting / unmounting when mount point contains a “space”
  • Fixed bug if the share path or mount point contains a trailing slash
  • Changed the default mount point “base” to /sdcard/cifs/ instead of /mnt/cifs/. This eliminates the need to remount / as read/write. If you have mounts already defined to /mnt/cifs/, I suggest that you move them to /sdcard/cifs/ otherwise you will get errors when mounting and you will manually have to remount / as read/write.
  • Added a built-in file/folder browser used for selecting the mount point or browsing for module files to load.
  • Added ability to browse for network shares. Some machines are not browsable, depending on how the shares are set up. In these cases, you will just have to manually enter the share path.
  • Updated the admob library to the latest version.

mm-nui-1 mm-nui-2 mm-nui-3 mm-nui-4 mm-nui-5 mm-nui-6

Getting GPS working again on the Vibrant w/ CM7 nightlies

I love CyanogenMod and I thank all of them for their hard work that they do for basically nothing except the “thrill”. I have been using that since the very first version on my HTC ADP1. Then I bought the Samsung Galaxy S Vibrant from T-Mobile and CM was not available for the device. I stuck with the “Stock” Samsung TouchWiz UI that I made some tweaks to here and there to get a better experience for myself. I did things like rooting the device, adding the CarDock, removing the crap software that I don’t ever use, removed the “WorldClock” and added the stock Alarm Clock and other things here and there.

The GPS on this device has always been a topic of discussion, as there were issues with it from launch. It would take up to 10 minutes or more, to get a lock, and once you got the lock, you would probably lose it. There were people much smarter then me that found ways to make the GPS usable on the Stock TouchWiz UI.

After some time, Team Whiskey released the Bionix ROM. This was/is a ROM still based off the TouchWiz version of Android at its core, but was a better experience as it included functionality that was not in stock TouchWiz, and it didn’t include the bloatware. The biggest thing that Team Whiskey brought to the Vibrant with Bionix was Voodoo. Now, I know they did not create Voodoo, and other ROMs had support too, but I am just babbling about what Bionix did for me. I ran this ROM for some time, and a mod that I created that brought the Gingerbread keyboard with working the hepatic feedback to FroYo ROM is even included in the distribution. But there was still something missing for me.

I believe, at least for me, that the Vanilla Android is a better user experience, and the CM modifications, is that experience, plus more for your “die-hard” android users. I would go to the CyanogenMod website often to see if there was any developments on getting a build of CM running on the Vibrant. Now, you may read this and say “It ran on the Vibrant for a while”, and that is true, but the steps needed to install it on the device was a pain in the ass, not to mention that there were a lot of things that were not working. These are the things that kept me on Bionix. Then the CM team that work on the Vibrant (and other Galaxy S devices too) got the install process to be a lot less of a pain. At that time, I decided to give it a try, and I knew that GPS, among some other bugs existed.

Then shortly after I started flashing these unofficial builds of CM, the nightlies started. At the time of this post, they have over 75 nightlies, but there are still some issues with it, including GPS. Which brings me to the actual title of this post. I found this thread over on XDA by stricklyrude27. He put together a set of scripts and files and steps that were created by other people (see thread for their credit) and placed them in to a single update.zip package.

I am running CM7.1-N76 with the GPSFix v1.4 and GPS works great. I get a lock in just a couple of seconds. If you are running CM7 on your Vibrant, head over to the thread and give it a try, at least until an official CM7 solution comes about.

Thank you to all that contribute to the CyanogenMod and especially to the SGS Team, also thanks to all that were involved in getting this fix working too. The android community is great and love that just about always, a solution to any issue is found.

Logitech Revue and Acoustic Research XSight Touch

Yesterday was a good gadget day for me. Both my Logitech Revue and Acoustic Research XSight Touch arrived in the mail.

logitech-revue-8So far I like the Revue. $99 is a much better price for that device, I don't know if I would have been too happy if I paid the $249 for it. What I really want is ADB access to it, or I would settle for the Android Market. It needs "more" apps. My TV has more apps then the Revue, but I really like Chrome and the Logitech Media Player (I think its just a DLNA client). It works well, I watched a couple videos streamed from my PC to the Revue and used TVersity to do the transcoding.

The Netflix app is what you would expect, actually, it is the exact same app that is on my Vizio TV. The gallery app will pull down your images from Picasa.

I also like the Queue, but I will probably use it more for NetCasts like TWiT and TWiG. The Queue does fall a little short when it comes to searching for NetCasts. There is no way to manually type in the RSS feed in the Queue, and some that I searched for, like TWiG, would only give me the audio feed. You can get around this limitation by opening up Chrome and visit the NetCast site and select the RSS icon in the Search bar, or open the RSS feed directly if it is available. This will open up the Queue subscription option screen.

I am very eager for the Market to come to the Revue. I can’t wait to start writing Android applications for this and other Google TV enabled devices.

I still have a lot of playing around to do with the Revue, but so far, I am of the opinion that it is well worth the $99. If you don't have one, and thought about getting one before, I say go get it now.


acoustic-research-xsight-charging-cradleThat brings me to the AR XSight Touch Universal Remote. I got the XSight Touch off Woot.com when they had it on there about a week or so ago. It was a good deal, they retailed for about $250, but Amazon has them now for about $75. Woot had them for $40 with shipping.

The remote will control up to 18 different devices and has a 2.2" Color LCD touch display. It has built in 433 MHz RF but requires an accessory to make use of that. The buttons are back-lit and are easy to see in the dark. The remote as an accelerometer of some sort, as it will automatically turn on the display and key lights when the device is picked up. It comes with a lithium-ion battery and a dock for charging the remote. The remote can "learn" from other IR remotes, programmed via the remote itself, or you can program it using an online tool with a huge collection of devices in their database.

Setup was pretty easy, I did one device from the remote, and 2 more from the website. The website tool did seem a little slow, but I hope it was because all the "wooters" were trying to setup their devices. The website saves your configuration so if the remote loses its configuration, it can be easily restored. You can also setup "key macros" so you can easily turn on/off a range of devices with one key press. It can even control some home automation stuff, like security systems, lighting, etc. I have mine set up to control my Vizio TV, Xfinity HD Cablebox and Xbox 360.

Overall, I am happy with the XSight, and I will be using that as my main remote for the TV/Cable, and the Revue keyboard will be when I want to actually make use of the Google TV functionality.

Logitech Revue w/ Google TV - http://amzn.to/pulB7a
XSight Touch Universal Remote - http://amzn.to/oFHrNE

Droid Explorer 1.0 on Non-Rooted Devices

I hit somewhat of a milestone today. I got the Droid Explorer 1.0 branch to build. Not only that, about 90% of the communication from Droid Explorer and the device is now done through MadBee. That’s the Managed Android Debug Bridge, if you were not aware. MadBee is basically an enhanced port of the Android Debug Bridge library that ships as part of the Android SDK. There are other features that I have added to it, like the ability to check if the device has BusyBox, or if the device can execute SU commands.

MadBee is available from NuGet, but is still very young. I occasionally notice some issues with how things work while using it as the “power” behind Droid Explorer, and go in and make some modifications. But I always update on NuGet, but that means I may update there often.

What, exactly does MadBee mean for Droid Explorer? Well, I am glad I asked. MadBee is the link between the device and Droid Explorer. Since it is based off the original Android Debug Bridge, it was initially meant for non-rooted devices. It has always been my intentions, and goal, to have Droid Explorer working on ALL devices, not just rooted ones. MadBee helps make that happen. Now, MadBee does not circumvent any security that is already in place on your device, so if you don’t have a rooted device, you will not be able to perform any tasks that would require root, like remount /system with read-write.

There is still a lot of work to be done before this build of Droid Explorer will be ready for the public, but here is a teaser of Droid Explorer connected to a non-rooted Galaxy Tab.

de-on-unrooted-gtab

Droid Explorer 0.8.8.2 Released

sgstabshotdeviceselectiondialogI released an update to Droid Explorer today that addresses some needed issues.

  • New Device selection dialog
  • all assemblies are now signed again
  • fixed the "runner" so apk's can now be installed from the machine (along with the other plugins)
  • when upgrading, and using an existing SDK, the value will now be pulled from the registry, if it exists.
  • fixed bug in uninstall that would remove the sdk, even if you used an existing sdk
  • removed anda.pk plugin since the site is dead.
  • added a link in the bootstrapper (installer) to download the sdk.
  • refactored some strings to the external resources files in the bootstrapper (installer)
  • changed the reboot commands to use the adb commands, not the shell commands
  • fixed rm command to now use busybox as it was passing args that are not supported on the "stock" rm command.
  • added the sph-p100 (Sprint Samsung Galaxy Tab) device icon


Download Droid Explorer v0.8.8.2

CyanogenMod 7 on Galaxy S Vibrant

CM7_256_072The nightly builds for CyanogenMod 7 for Samsung Galaxy S line of devices is now available via Rom Manager. It is now a “Single Update” install, 2 if you want to add gapps.

Here are some of the issues I had when doing the install, and how I worked around them.

  • Follow the instructions Here and Read the FAQ here. This is just a “helper” for some of the issues I had, not a replacement or step by step.
  • You will need to be able to get in to the Recovery via the 3 Button Method. If you cannot, then you will have problems.
  • Before you start with ROM Manager, you need to download the gapps package and place it on the internal sdcard. You cannot use ROM Manager to install the gapps, it will not work.
  • The easy part is installing CM7 from ROM Manager. Open up Rom Manager and download the CM ROM
  • ROM Manager will now download the ROM. Once completed, it will prompt you to wipe data and cache and backup. You should do them ALL. Then Click OK.
  • The device will reboot and it will install the CM package. Be patient, it can take a while.
  • Once the device is rebooted you will want to turn the device off. DO NOT USE ROM Manager, or any other shiny thing, to get in to the recovery, it will not work correctly.
  • Power the device back on using the 3 Button Recovery method. Hold down Vol+ & Vol- & Power. Once you see the “Vibrant” Screen release ONLY THE POWER button.
  • Now that you are in Clockwork, select install package from sdcard and select the gapps package you downloaded before you started.
  • Reboot your device and enjoy.
  • Update: If your PC does not recognize your device any more, you need to install the Google USB Drivers.

I forgot how much I missed using AOSP + the things that the CM team adds to the party. Being stuck using TouchWiz for so long, it is like getting a new phone again. Even if you run ROMs like Trigger or Bionix, you are still stuck with the TouchWiz additions.

Thanks TeamHackSung, my Galaxy S is happy now.

Droid Explorer 0.8.8.0 Released

explorer-viewLast night I released a new version of Droid Explorer that addresses some major issues that were introduced with the latest versions of the SDK.

  • Fixed the issue with the latest android SDK using “platform-tools” directory instead of “platforms/android-{platformversions}/tools”.
  • Fixed the screen shot tool to support newer devices (some are now using 32bpp RGB, instead of 16bpp RGB565)
  • Fixed an issue with the Bart plugin license not being detected on the device.
  • Fixed the console not working on some devices.
  • Added Device icons for the LG G2X and Samsung Galaxy S variants.
  • The Google USB drivers have been removed from the installer
  • Use existing SDK is now the default and recommended option
  • Other minor fixes

Download Droid Explorer 0.8.8.0

As always, there are x86 and 64 bit versions available.

The Standalone version is an “Offline Installer” where the other can download additional files (if you are not using an existing SDK).

The last release of Droid Explorer (0.8.7.2) has ~139,000 downloads since August 21 2010, exactly eight months ago. The plan is for more releases of Droid Explorer, in much shorter time frames again. So lets see if the 0.8.8.0 can exceed the number of downloads before the next release (I doubt it will happen Smile)

Ad-Blocking in Apps is Piracy

I recently received some negative feedback on Mount Manager in the Android Market regarding my strict identification of ad-blocking applications.

The user said:

While I understand where the dev is coming from, the ad blocking restriction on this app is ridiculous. Ryan Conrad needs to understand that he is only encouraging piracy in his own app. Apps like this hurt the dev community for android.

This is not the first time that someone has complained about having to remove their ad-blocking software in order to use Mount Manager. Also keep in mind, this restriction is ONLY in place on the free version, if you purchase a license, you can use ad-blockers if you choose.

I feel very strongly against the use of ad-blocking, especially in applications. The ads that are displayed, potentially, generate revenue for the developer. If you have software that blocks these advertisements, you are preventing the developer to earn revenue, and thus committing piracy.

You probably completely disagree with me. You think ads in applications are annoying and get in the way and you never click on them any how, right?

Ok, well, Mount Manager, like many other applications, offers an ad free version, that also includes other features. But guess what, it isn’t free! I understand that you don’t want to see the ads, even if you never plan on clicking on them, and I offer a way for that to happen, while still allowing me, as the developer, to earn some revenue from the application. Remember back in the day, you had NetZero (it was actually free at one time), a free internet service provider. But guess what, they loaded advertisements up on your screen that were there while you were connected to their service. If you didn’t want to see the ads, guess what you had to do, that’s right, you had to pay for internet service.

So, that is my stance on ad-blocking applications for use with applications. I don’t expect it to change either. As long as I write applications, that display advertisements, I will have code that blocks the ad-blockers… I actually think it is sort of funny that people are mad that I have an “ad-blocker blocker”.

Mount Manager License

The $2.99 price for Mount Manager License was originally just a discounted price for the first 100 sales. I have decided to extend this sale price indefinitely. This price seems very far, and a good price point. So the permanent price of Mount Manager License is $2.99.

I would like to thank everyone that has reported any issues in Mount Manager and helped make it a better product. You are the reason that the product is keeping this discounted price.

Mount Manager + Locale / Tasker

The latest version, just published on the Android Market contains a new feature for licensed users. You can now use Locale / Tasker to automate the mounting or unmounting of your shares.

By setting up your conditions, like using the Wifi Connection plug-in, you can set shares to mount when you are connected to a specific wifi network, or unmount others.

Mount Manager Mount Manager License

The license is currently available for $2.99 for the first 100 sold. After that, the regular price of the license is $4.99.

Mount Manager License on Sale

The Mount Manager License that removes the advertisements from the application, plus will enable the Locale/Tasker plug-in once completed, is now on sale in the android market.

Mount Manager Mount Manager License

The price of the license is $4.99, but for the first 100 people that purchase the license it is available at a discounted price of $2.99. The license will guarantee that you have access to all the features in Mount Manager.

The application is fully functional as it is, but the license will enable other features, plus remove the ads.